Gand's simple FZ6 Dual Headlight mod
DISCLAIMER: This information is for informational purposes only. I take no responsibility for damage to yourself, your bike, or your dog. I have installed and tested this mod on a 2005 FZ6 but other years may differ. Refer to your service manual's wiring diagram if you have any doubts.
WARNING! This mod is not intended to be used if you use high-beam for long periods of time! Due to the simplicity of the mod, both filaments of the right headlamp will be lit when the high-beam is on. This can significantly shorten the life of the right bulb. However, if you use low beam primarily there is no problem. If you use high-beam frequently, consider WTVa's mod.
Intro
The Yamaha FZ6 is an awesome bike, no doubt about it. There's really only two complaints that I have: 1) the silly fender, which FAZR6's excellent FE kit takes care of, and 2) the 'winking' headlights. For whatever reason, Yamaha decided to only activate the left low beam. Now, the stock bulb in the right side is a standard H4 bulb, which has both high (65W) and low (55W) beam filaments. It just needs to be wired in.
There are many ways to do this, such as splicing the wiring under the tank or splicing the wire near the switch. However, the approach I took is so simple I wonder why noone has done it before (or maybe they have but noone has written it up yet!)
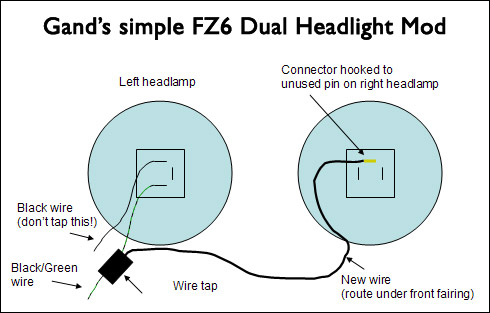
My method was to splice the positive lead on the left headlamp, and run a wire over the existing blade for the low beam on the right headlamp. Simple.
If for some reason you run into problems or have questions, shoot me a PM on sportbikes.net. My username is Gand.
 What you need
- 1 wire tap that can take 14-gauge wire
- 3 feet or so of 14-gauge wire (stranded)
- 1 connector to hook to the blade on the headlamp holder. You may have to experiment with this one, but there are lots of things that will work.
- Black electrical tape
What to do
Right and left are defined from the perspective of being seated on the bike
- Solder or crimp the connector to the 14-gauge wire.
- Pop open the cover on the right headlamp. Attach the connector to the unused blade on the headlight holder. (Or, if you are like me and can't be bothered to get a connector, make something else work.. it just has to have a solid electrical connection.) Use electrical tape to secure connector if needed.
- Route the cable under the front fairing (just follow the other right headlamp cables) to the left headlamp. Secure it with zipties or electircal tape.
- Peel back some of the tape on the left headlamp leads. Use the wire tap to splice the positive lead (green/black wire, NOT the solid black wire) to your new cable. On mine, this cable was the lower of the two.
- Wrap the wire tap in electrical tape to make it water-resistant.
That's it! Fire up the engine and test it. Both lights should be lit when running.